Container Groups: Use Height and Repetition to Unite Your Pots
Container groups feel deliberate when repeated shapes or materials tie varied pot heights together; plan a balanced display that suits your planting and space.
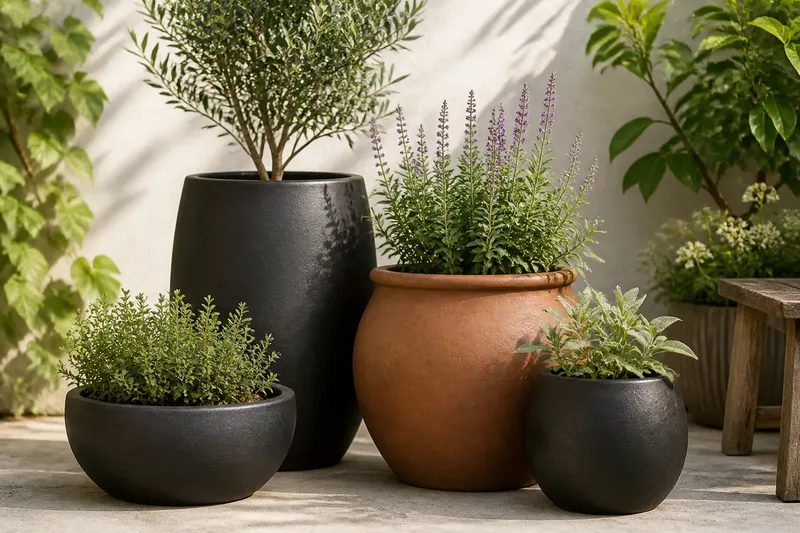
You set a new pot beside the old ones, step back, then shift it again: the group still looks like a row of unrelated containers. Container groups become more cohesive when their heights vary but a clear detail repeats, such as shape, colour or material. A week of small decisions is enough to plan an arrangement that feels composed without making every pot match.
Choose the unifying detail
Start by looking at the containers you already own. Put them together temporarily and note what they share. A rounded rim, a narrow foot, a matte finish or a warm clay colour can be the repeated feature. Pick one main link, rather than trying to make every detail identical.
Repetition does not mean buying a matching set. A group of different pots may still feel related if their outlines echo one another. Likewise, pots with distinct shapes can sit comfortably together when they share a material or restrained colour family. The repeated feature gives the eye a familiar point to return to, while the differences keep the display from looking like a catalogue row.
Be specific about the link. “Natural” is too vague to guide a choice. “Unpainted terracotta”, “rounded shoulders” or “dark, unglazed surfaces” gives you something you can check against each container.
Day one: assess the spot
Choose the place where the arrangement will live before selecting plants or buying another pot. Look at it from the doorway, a nearby seat and the approach to the space. Notice what sits behind it: a plain wall may suit a taller outline, while a busy fence can make a quieter collection easier to read.
Check how much room the group can occupy without obstructing an entrance, window or outdoor task. This is not about creating a route through the space; it is about giving the pots a defined area. A patio corner, the edge of a step or one end of a balcony can each work if the containers remain easy to tend.
Also notice the light and exposure at the intended spot. Plant choices should suit those conditions, and the containers must be suitable for outdoor use. If the placement or pot’s suitability depends on product instructions or local rules, check those before committing.
Day two: sort by height
Gather the pots and arrange them on the ground in a few height groups: low, middle and tall. Use the containers’ actual outlines, not just their rims, because a narrow, tall pot reads differently from a broad pot of similar height.
A useful starting arrangement has one noticeable tall container, some middle-height forms and a low container that gives the group a visual base. You do not need one of each, and the tallest pot need not stand in the middle. A cluster can feel more natural when the highest point sits off-centre and the smaller forms step away from it.
Try the grouping from the main viewing position. If the pots merge into one block, separate their outlines slightly. If they look scattered, bring them closer. The aim is for the eye to move between the different heights and still recognise a single collection.
Day three: test repetition
Choose the repeated feature and place its clearest examples where they are easy to see. If shape is the link, let two rounded pots repeat across the group, then use a different silhouette as an accent. If material is the link, keep that material visible rather than hiding every shared surface behind foliage.
Think of the repeated feature like a refrain in a song: it returns often enough to make the parts feel connected, without turning every part into the same note. In practice, that may mean repeating one finish while varying pot height, or repeating a rounded profile while mixing colours that sit comfortably together.
Say you have a tall, narrow charcoal planter, a low charcoal bowl and a rounded terracotta pot. Imagine placing them together with the two charcoal containers as the link, then adding a smaller charcoal pot if the display feels too divided. The expected result is a group whose varied outlines remain noticeable, while the repeated dark finish helps them read as companions. If the terracotta pot draws too much attention, move it to the edge or choose a less contrasting position rather than adding more colours.
Day four: make a planting plan
Decide what each container needs to do for the arrangement. A tall pot can carry an upright plant; a lower one can hold a rounded or spreading form. Think about the mature shape and the way foliage will sit above the rim, not only the plant’s appearance in its nursery pot.
Keep the planting relationship simple. Plants with broadly similar light and watering needs are easier to tend when grouped together. If one container needs a different routine, place it where you can reach it without disturbing the rest. Choose plants for the actual exposure at the site, and leave enough room for their growth rather than filling every visible gap on planting day.
Planting should support the container group, not conceal its design. Leave parts of a distinctive rim or surface visible where that repeated detail matters. If foliage will cover a pot almost completely, it may contribute height and volume but do less to reinforce the shared material or shape.
Day five: check the visual balance
Set the containers in their planned positions and look from the places where you expect to see them. Check whether the tall form has a clear relationship to the lower ones, whether the repeated feature appears more than once and whether one pot dominates for a reason you like.
Pay attention to the space between containers as well as to their height. A tight cluster can feel intentional, while small, even gaps may give each outline more definition. Avoid arranging every pot at an identical distance unless a deliberately formal display suits the setting.
Take a photograph from your usual viewing point, then compare it with what you see in person. A photograph can make crowded outlines or a weak repeated detail easier to spot. Use it as a prompt for adjustment, not as a rule about how the arrangement must look.
Day six: settle the positions
Move each pot into its final place only after checking that you can reach the plants for ordinary care. Leave room to remove dead leaves, water the soil and inspect the pot. A group that looks neat but makes basic tending awkward will be harder to maintain.
Keep the arrangement’s strongest link visible from the main viewpoint. If the repeated material faces away, turn the containers so that the shared surfaces can be seen. With patterned or unusually shaped pots, choose the side that shows the feature you want the group to repeat.
If a pot is too heavy to move comfortably, do not try to shift it alone. Ask someone capable of helping or adjust the arrangement before planting, while the containers are easier to handle. For routine placement, a simple check with your hands and walking space is more useful than a display that only works from one angle.
Day seven: review the group
After living with the arrangement for several days, notice what catches your eye and what feels awkward. A plant may lean towards the light, a tall pot may obscure a view, or a repeated finish may disappear once leaves fill out. Change one position at a time so you can tell which adjustment improves the whole.
Do not treat every difference as a problem. A small change in shape, colour or height is what gives a group character. Adjust only when the relationship between the containers becomes hard to read, or when care and access are compromised.
Questions about container groups?
How many pots make a group?
Use enough containers for the repeated feature to register, while keeping the arrangement suited to the available space. A small cluster can look complete if height and shape vary clearly; a larger collection needs a visible link to avoid appearing scattered.
Should all the pots match?
No. Repeat one clear quality, such as material, finish or outline, and let other details vary. Matching every feature tends to make the differences in height less noticeable.
Can I mix pot materials?
Yes, if the group still has a repeated visual cue. For example, a shared shape or colour can connect different materials, while a range of unrelated finishes and silhouettes may need a more restrained arrangement.
Where should the tallest pot go?
Put it where it gives the group a clear high point without blocking a useful view or making the arrangement feel lopsided. Test it off-centre as well as in the middle, and judge from the place you normally see the pots.
Keep the link visible
As plants grow, check that foliage has not hidden the feature that brings the pots together. Trim or reposition plants when appropriate, and turn a container if its shared finish has become obscured. The useful principle for container groups is simple: let height create variation, then repeat one visible detail to keep the arrangement connected.